Popular Posts

Wednesday 17 June 2015

French Cuirassiers (Perry Miniatures) 28mm


Newest box completed in time for tomorrows 200th anniversary of Waterloo. These are a set of French Cuirassiers by Perry Miniatures (link) I got these from ebay from nannyogg999 on ebay who has a fantastic range of models and exceptionally quick delivery times. I've ordered two sets from this seller now and both have arrived within 2 days of me placing the order.


This is a nice set to work on and the first cavalry I've done since I worked on a set of Warhammer Chaos Knights. The only issue I had was that I managed to screw up which figure was riding on which horse and which legs belonged to who. This wouldn't normally matter but as the officer would have ridden a different horse, had a different helmet and had a different set of legs it does make a difference. As it turns out I didn't actually make an individual who can be identified as an officer because of this.

Other than that these were nice to paint although I had some issues with a very thick black undercoat, I must have sprayed too close!

Sunday 7 June 2015

Tiger 1 Ausf.E - Rubicon Models - 28mm

During an unplanned trip to Dark Sphere models in Waterloo I couldn't resist the urge to get something new. So after kidding myself for about 15 minutes by saying I'd only buy paint and some brushes I ended up at the till with this box...

This will be the first WW2 model I've done since I was about 9 and I screwed up a few airfix tank boxes. WW2 never really appealed to me as much as the Napoleonic era as it's all pretty dull. What I mean by this is that the uniforms etc are mainly green/grey or brown mixes and the old style tank kits didn't seem to have enough detail.

This kit on the other hand seems pretty exciting, you don't have to fiddle with rubber tank tracks - they're solid moulds. The fiddly bit is the MG mounted on the turret, but as long as you're patient and allow the glue to dry it's not bad.

The thing I like about this model is the extra track parts you can glue to the hull and turret, they're going to break up the camo a bit so it doesn't just look like a turd with leaves one!

Here are a few shots of the assembled beast prior to undercoating.

Still got to choose what kind of paint scheme to go for, whether it be North Africa, Russia or Europe. The Rubicon Models page has an interesting paint scheme but I think I'll pick something along these lines.


Update:

So I've started painting this Tiger, I managed to finish the cavalry I was working on so this was next in the queue.

I undercoated it with uniform grey from the Army Painter range - this is a nice neutral undercoat which seemed to work really well by itself. I could quite easily have just highlighted this coat and gone for a grey paint scheme.


I followed this with a coat of dark brown mixed with a little chain mail in the areas that won't be touched by the dry brushing - it didn't seem that this worked once the initial dark brown coat went on. Following this I've dry brushed it twice with a mix of bronzed flesh and bone white from Vallejo, to me it looks too bright - almost like an Essex girl after a spray tan! So I'm going to try tone it down a bit with an earth tone. I'm aiming for a colour a bit like this but it's pretty hard to hit!


Wednesday 3 June 2015

The English Army 1415-1429 (Perry Miniatures) 28mm

Here is a link to the completed set that I've recently posted! The English Army 1415-1429 (Perry Miniatures) 28mm (Finished)

Again taking inspiration from a series of books I've read the Grail Quest and Agincourt both by Bernard Cornwell (again I know!.. guess where my interest in the Napoleonic Wars came from too?!, that man has a lot to answer for). I decided to pick up a set of Medieval infantry from Perry Miniatures, this set contains parts to make both archers with war bows and men at arms - fully armoured and carrying polearms (although scabbarded swords are included).

The set contains 24 archers and 12 men at arms, banners, bases and as seems to be the norm with the Perry brothers a very useful painting guide.


 The figures themselves are very detailed and look like they will be great fun to paint.

 Archer sprues contain the choice to add a trumpeter or to arm the archers with mallets, swords and other weapons - particularly handy for battles like Agincourt where the archers played a big role in killing so many captured French nobles. The torsos are wearing padded jackets or gambesons and all are armed with a dagger.

 The men at arms come with a variety of weapons including poleaxes, swords, warhammers, axes, lances and spears. A shield is included on each sprue but from the description on the Perry website it seems that these were almost useless at the time due to advanced in armour design.
Each sprue for the men at arms includes separate visors and orles - which seem to be padded circlets worn around the head. The armour comes mainly without surcoats over the top so painting should be a pretty simple drybrush job.

The poses seem pretty similar at the moment so it will be good to get these off the sprue and start putting them together!

More to come soon!


So here are a few test shots of the poses I've put together, I've used blue tack to stick them together for now as the two handed polearms cant be a pain to line up at times!
 
As you can see the poses are very dynamic, my favourite is the guy with the sword and his hand up, as if he's saying to the French "come at me bro".

Viking Hirdmen (Gripping Beast) 28mm

So this is my first set after almost a decade out of the game. I used a number of painting guides around the internet (in particular a youtube channel from Joey Berry who has a number of helpful videos and guides to get certain painting effects).

I went for this set first having read the Saxon Stories by Bernard Cornwall (Epic stuff!), the Raven Trilogy and God of Vengence by Giles Kristian (really worth reading) and watching the History Channel's Vikings show. I picked these over the Wargames factory kit after reading this review from An Hour of Wolves & Shattered Shields.

Now I know that my figures in no way match up to professional painting standards, but I was surprised with myself given some of the horrific figures I produced when I was younger!

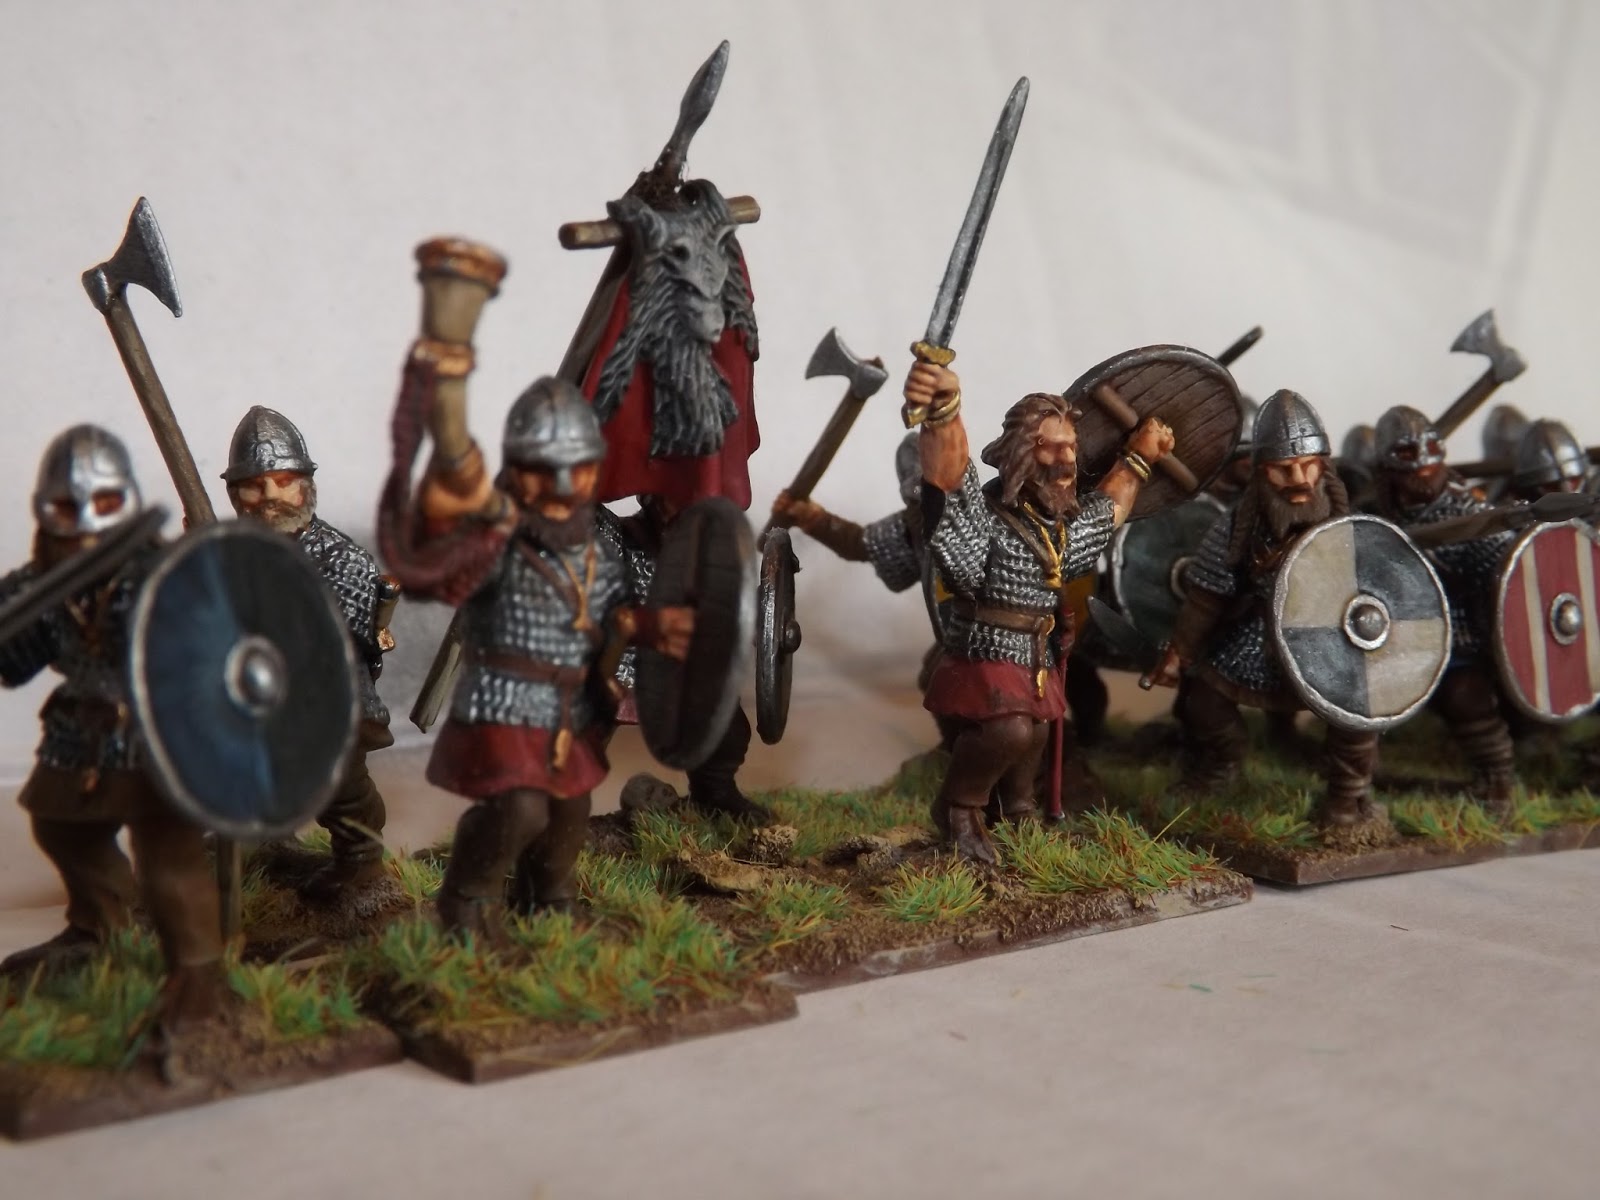
So in this box you get 44 figures, with an assortment of weapons including swords, axes, Dane axes, spears and seaxes. The poses available allow you to create warriors who appear to be standing in a shield wall (that is facing at a right angle to the enemy with a shield protecting their body).

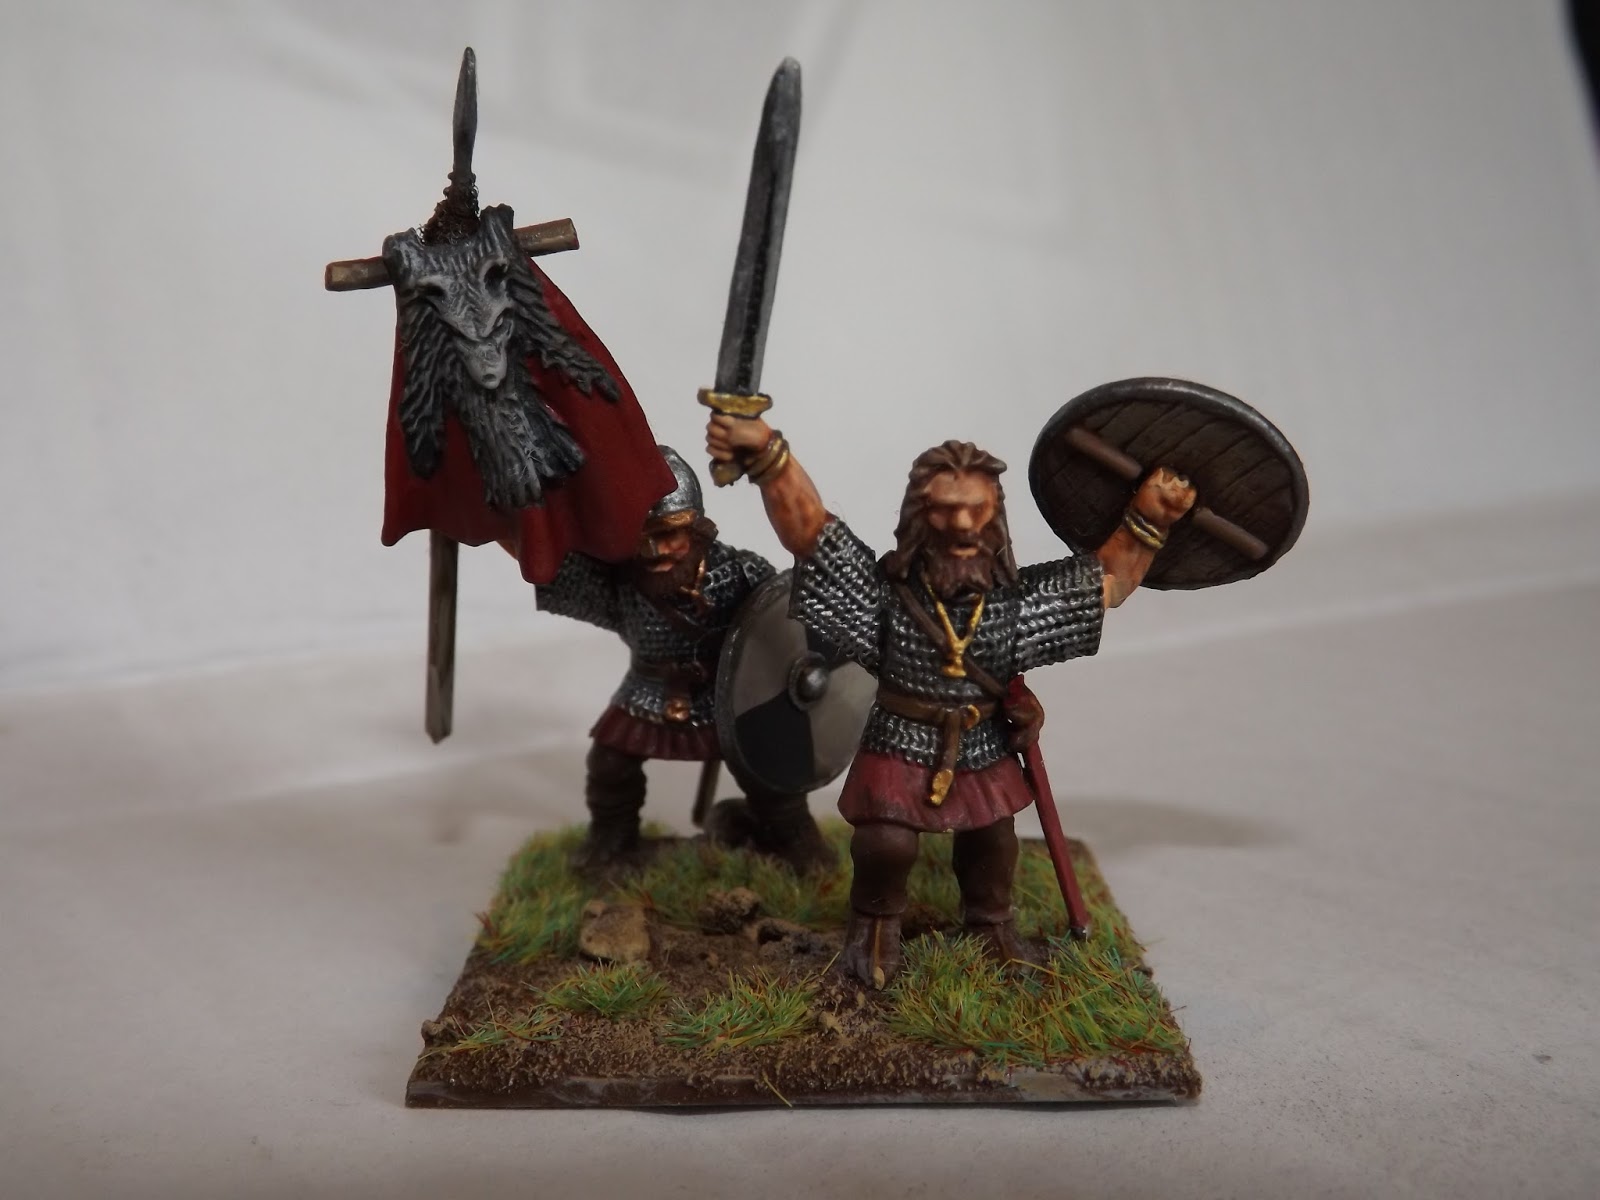
There are also parts to create a command group (Warlord and trumpeter), there is a banner included but I decided to get a bit creative myself.

Since making this kit I've found out that you can get transfers for the shield designs (here) they would have made the shields much more interesting.


I kept the colours simple for this set, I didn't want to have trouble replicating the mix if I needed to patch them up and I'm also of the opinion that it's more historically accurate (whilst on campaign a Jarl wouldn't want to soil his best clothes would he?)

To create the spear to hold the standard ( which is intended to be a cloak for the warlord) I took the arm that I used for the warlord and removed the sword, I then replaced it with a spear, created a crossbar from another spear and lashed it in place with thread. I like to think that this adds a little originality to the figure, whether historically accurate or not I don't know but it doesn't seem that much is known about the standards the Northmen used apart from the Raven banner.


 Trumpeter & Dane axe
 Pair of Dane axe wielding loons
 Trumpeter alone
 Troop marching. I'm very proud of the figure on the right as I've adjusted the left arm so that it sits on the pommel of the sword. I took the arm intended for the left arm of a man holding a Dane axe and trimmed it slightly to fit. Ideally I'd have used some green stuff or putty to fill the gaps but I'm not confident enough yet to use that.
 Troop advancing from another view.
Individual figures advancing.


 Shield wall line


 Full host with commander

 The charge

The clash of shield walls... slowly


Paint Station & Paints

So once I eventually got my stuff I set about unpacking what I'd spent my money on.

Paint Station

The first (and I think most impressive thing) I got was a paint station. I got this for about £20 (including postage from Poland) from a company called HobbyZone (http://www.hobbyzone.pl/en/tables-for-painting/14-paint-station.html)


It came in a small flat pack box and only needed a little glue to put it together, and I've got to be honest it's a live saver! I do my work at my desk, and although it's only an IKEA desk I don't want to ruin it. I want to paint models not my furniture. It's sturdy, compact and fits nicely under the bed when I need to move it away. They look like they have a great range including transport cases and even boat building tools!

Paints

I opted for the Vallejo Game Colour Introduction set.


For £30 this set contains x16 17ml bottled paints:
Dead White
Sunblast Yellow
Orange Fire
Bloody Red
Ultramarine Blue
Dark Green
Goblig Green
Bonewhite
Bronze Fleshtone
Cobra Leather
Beasty Brown
Stonewall Grey
Black
Silver
Gunmetal Metal
Polished Gold

Confession - I also bought a few extra bottles of paint and wash (the best one being Army Painter's strong tone).

It's a good selection and I find the paints are of a very good quality. The bronzed flesh isn't much good even as a flesh base (I've had to move to using Cadmiun Skin laced with bonewhite to tone it down). The metallic paints cover well but if they're watered too much you'll need a couple of extra coats.

Undercoat

I went for one of each of the Army Painter spray undercoats in Black and White.

Since I've now completed two different sets of figures (Vikings and Napoleonic Cuirassiers) I can honestly say that I'm going to switch to a light grey primer/undercoat rather than white or black. When using the white to coat figures it can show through even if you miss just the smallest speck, whilst using the black really does bring the whole colour of the model down a few notches.


That's all for now, I did get myself a few other bits - glue, sand, static flock, brushes, cutting matt etc but let's be honest they're more boring than spray paint.